Sunday, December 25, 2011

It's been awhile


I apologize for being away so long. Finals have come and gone and I am done! Two A's and one B are the end results - YIPEE! I also had two hand surgeries. I had carpal tunnel surgery on my left hand the Tuesday before Thanksgiving. Then the Tuesday before Christmas I had my right hand done. I am right-handed and this has been trying because my left hand is still quite weak. So I will use this time off to catch up on my blog entries among other things! Hope I didn't lose anyone in the meantime.

I made the above moose card for my husband's birthday. The cardboard behind the main image is recycled and torn to look old. I seem to be into recycling everything I see! The moose image is from a masculine set I got at Hobby Lobby a long time ago and have never used.

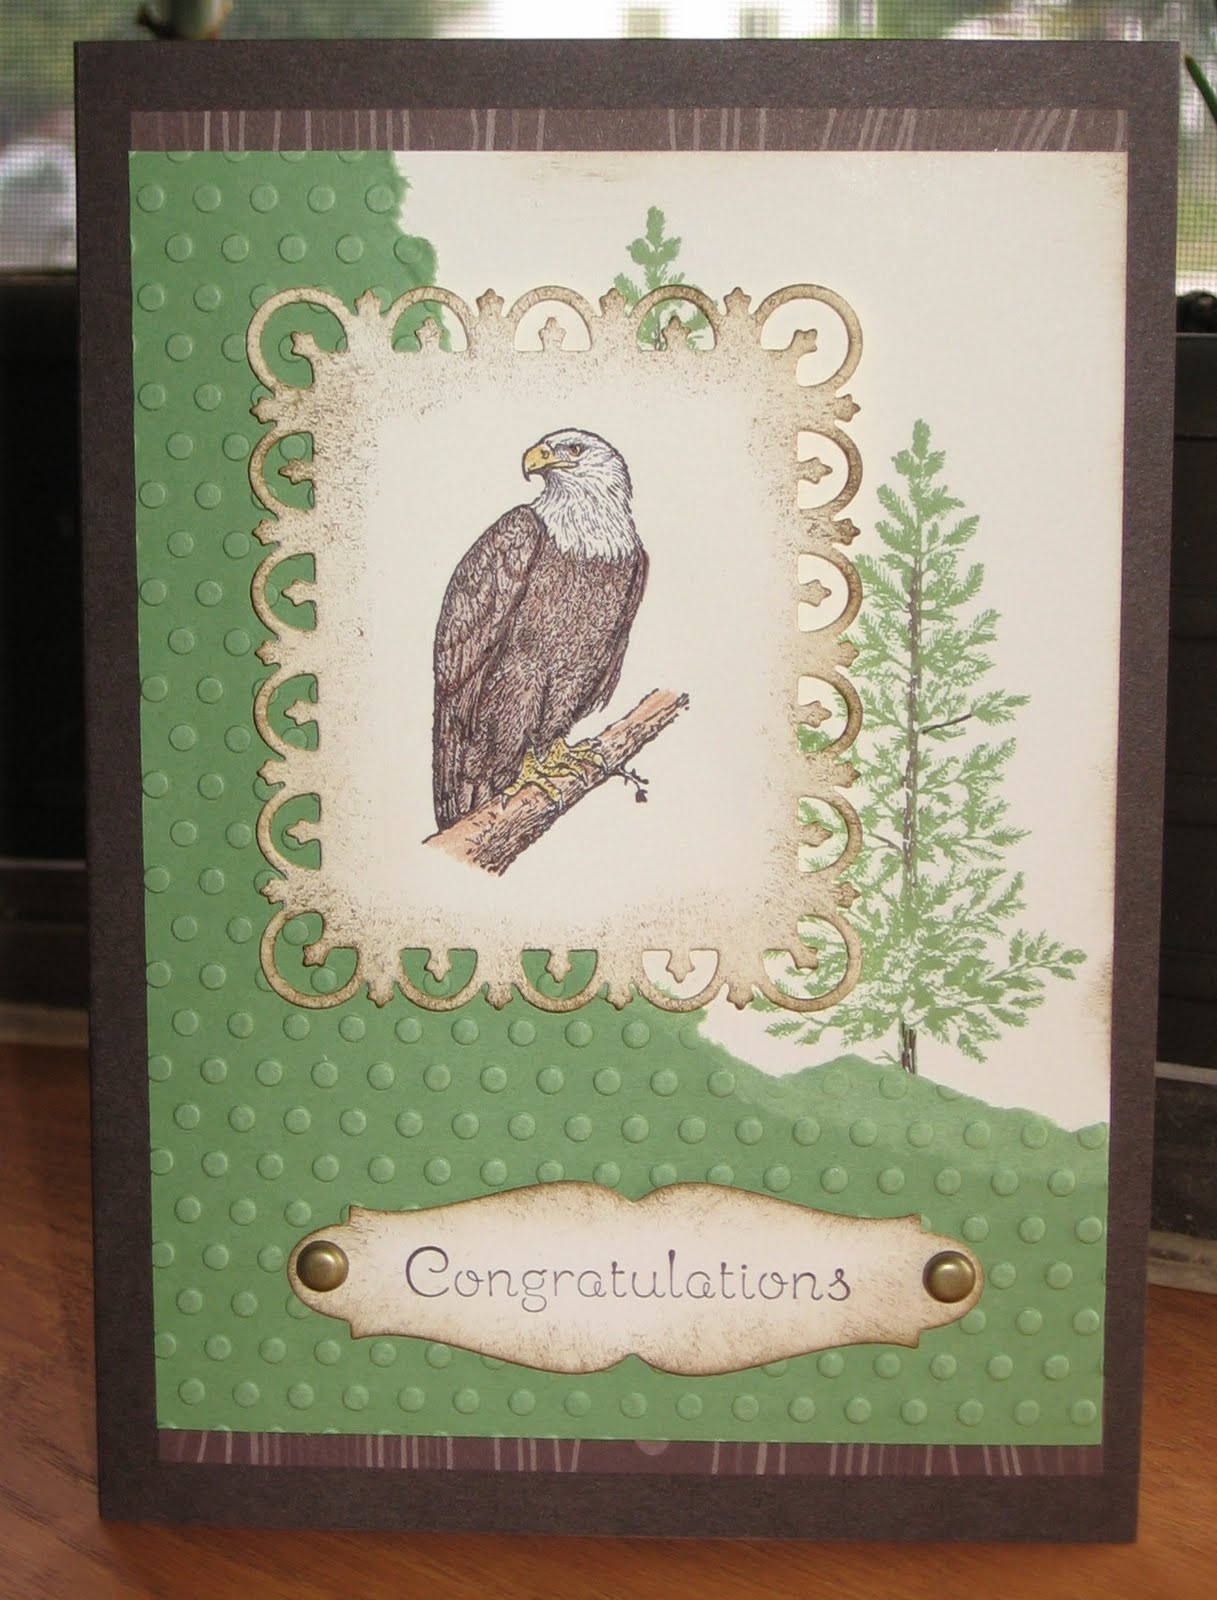
The card below is made with dies and stamps from Papertrey Ink. I am in love with this set, but haven't been able to use it much because of the hands. This is a larger card and I will be needing to make an envelope for it. Hope you have a great Christmas, Go Pack and goodnight! - Heidi

Sunday, November 6, 2011

Veteran's Day card


This semester some of my classmates have their clinical at a VA nursing home in Union Grove, WI. I had an idea to have those classmates over to make cards on Wednesday to take with them on Thursday for Veteran's Day on Friday! Let's see if we can do it! - Heidi

Thursday, October 13, 2011

The pencil box card!


More doilies, what can I say?! A fellow student had her pencil box out on her desk. The colors struck me so I wrote them down: cameo coral, elegant eggplant and cherry cobbler. This card is the result of that color combination with some certainly celery for the foliage. The dies are from Spellbinders: rose creations and foliage. The doily is from the candy aisle at Hobby Lobby - see this entry for more info. The background is French Script an old background stamp from Stampin' Up. - Heidi

Halloween goodies


First up is a pumpkin box using the fancy favor die from Stampin Up. I punched the face out using the large Jack-o-Lantern punch from EK Success. You have to fold the flap up and punch through it in order to get to the front of the box BTW. Then I glued a piece of black cardstock on the inside, but you could do yellow or glow-in-the-dark too! You could punch the pieces out in black and just glue them on for ease of assembling the box also. Then I used my retired horizontal slot punch from Stampin' Up to make a slot in the front and back of the box. Then I pulled my ribbon through and tied it with some hemp twine. I think he is super cute! I stuffed him with chocolate for the neighbor girls.


While browsing at Hobby Lobby (dangerous, I know) I came across these two stamps. The skeleton is from Stampabilities and the saying (below) is from Print Works Collection. The die is Two Tags from Stampin' Up. It was missing something at the top so I punched out a circle (1 3/8") in YoYo Yellow and layered it under the bat punch from Stampin' Up. The bat is retired, but it is still available on the Clearance Rack on SU's site - quick! The skeleton is embossed in white and looks pretty cool if I do say so myself. - Heidi


Monday, October 10, 2011

Funny furry folk


I saw this sketch in a magazine. They used the bear from Papertrey's Button Bits set. I thought to myself, how can I make this Stampin' Up? First of all the bear just looks unhappy so let's use him and put ink to a set that I have not inked yet! Then let's make him have a funny saying - I thought it was funny anyway! I tried drawing him a happy smiling face, but it looked like a moustache so I gave up. Funny card either way - ENJOY. - Heidi
PS the die is from the set that came with my Cuttlebug, but SU has a postage stamp punch!


Morgan & the Brewers


My new stamping & creating buddy is the neighbor girl. She is going to be 12 years old in a week so I made a sign for her room. She is a huge Brewers fan! The logo is hand cut by me. There is probably a way to do this with a Cricut & some software, but I have yet to figure this out. I think it looks faboo anyway. I hope she loves it! - Heidi

I LOVE these flowers!


These flowers are the new Rose Creations dies from Spellbinders by Donna Salazar. Normally I am not a flower person, but these are sooo easy and you know that I am kind lazy! You can sponge them in the die, sponge the edges or glitter them up! Oh the possibilities! The doily was from the Chancery restaurant and came under our appetizer so this qualifies as another "I've seen that before" creation.


The flower on the left was an afterthought boo-boo. You know where you assemble something and then think of a better way to do it! The flower on the right was glittered with Stickles before putting it together. The edges were sponged with white ink to lighten up the look and it is soo much better IRL!


Ahh, more glitter and flowers - I must be sick as this is so not like me! This uses the Carnation Creations from Spellbinders. The tips of the petals were sponged and then glittered to make that oh-so-cool effect. The doily is a pack from Hobby Lobby. It's in the cake making aisle and it's $2.99 for 24 doilies, but you can use the 40% off coupon and get it for even cheaper! You don't have to buy a stamp or a die to get great and cheap doilies! I used two of the three layers on my new EK Success butterfly punch and used liquid pearls to make the butterfly bodies. they look quite real if I may say - you just have to be patient and wait for them to dry! Have a great night. - Heidi

Merry Christmas - I've seen that before!


Here is an idea for a Christmas card. It uses the big scalloped circle punch and a circle punch from Stampin' Up. More importantly is that the bow has been repurposed! The type of bra that I wear has a little bow at the front. I cut this off because it leaves a bump under my shirt. That's okay I'll just use it on a card! - Heidi

Monday, September 19, 2011

US citizenship congratulations


I made this card for my husband Ernesto because on Thursday he is going to be sworn in as a US citizen. What say USA better than a bald eagle? The sets used are In Wilderness, Occasional Quotes and Lovely as a Tree. - Heidi

Monday, September 12, 2011

Here's some other stuff....


I am not sure why I am sharing this card with you because I don't like it. I wanted these dies and now I wish I hadn't done it! Oh well what are you going to do? Sell them in next year's rummage sale!

The below card was for Mojo 205 and I never posted it because I am not thrilled with this card either. This is a die from the same set, but I am just not liking it. The set is called

Wildflower Limited Edition Scrapbook Kit, in case you were wondering.

- Heidi

Thursday, September 8, 2011

I've Seen That Before - #4


Xavier loves Pokemon. He got a backpack and lunchbag for school this year with Pokemon on it. The tags were big and had the characters on it, so I decided to make two cards with them. Yes, I am cutting tags off of things again! The colors are Brilliant Blue and Summer Sun - retired SU colors. Had those corduroy buttons in Summer Sun and there you have a birthday card! - Heidi

I've Seen That Before - #3


Okay so the punch isn't that new. I made this card months ago when the punch wasn't in the stores yet. I love this triple layer butterfly punch from EK Success! The colors are Yellow Tart (PTI), Lucky Limeade and Wisteria Wonder from Stampin' Up. The stamp is from SU and the set is called You're a Gem. The ISTB is the doily underneath the Foliage (spellbinders). The last time we ate at Chancery this was under a bowl of soup and I took it before anything spilled onto it. Then I cut the doily in half and made two similar cards with it. - Heidi

Sunday, July 31, 2011

Boxes for Isandro's birthday


I made these favor boxes for my son's birthday party last month. I tried to make each box match the kid's interest. Isandro had a Cars 2 party at Chuck E. Cheese so he got the Cars box of his choice. There was a Mater and a Lightning McQueen box made with stamps from EK Success that I purchased at Hobby Lobby. My other son, Xavier, is into Pokemon. I made him a fancy favor box with a pokeball on it. The names were stamped using the Calendar Alphabets & Numbers set from Stampin' Up. - Heidi

Saturday, July 30, 2011

Pennants Punch ideas


I am sure that I have said this before. My best ideas seem to happen when I am half-asleep. While looking at the Stampin' Up IBC this morning I saw the Contempo Christmas set. I thought that perhaps the tree image might fit into the Petite Pennants Punch and sure enough it does! I embossed the tree in gold on Garden Green cardstock and punched it out. Then I cut the pot out and mounted it on Very Vanilla punched out with the Extra-Large Oval punch. Then I took a piece of Garden Green cardstock and embossed it with the oval Designer Frames and Vintage Wallpaper embossing folders. Used Encore gold ink to accent the embossing. Put the tree in the oval on dimensionals. Attached the GG to a piece of gold and then to GG card base. I finished it off with 1/4" GG grosgrain ribbon. Gold ribbon or cording would've worked also. It really is a cool card and much better IRL!


The above card uses the stamp set Party This Way from Stampin' Up. It is stamped in Melon Mambo on MM cardstock. The pennants are then punched out. The inner triangle is from the Good Neighbors mini-stack from a long time ago. Then I used the set Calendar Alphabet & Numbers to stamp the H B 2 U for Happy Birthday to you. The vintage wallpaper embossing folder on the Regal Rose cardstock is the background. Then I "made" brads with little circles of MM cardstock and crystal effects. I had a hard time finishing off this card. I used hemp cording to put the pennants together, but the SU white Baker's twine would do nicely. Enjoy your day!
- Heidi

Wednesday, July 27, 2011

What to do with DSP?

I am not a hug fan of the DSP, Cheerful Treat, which is a hostess paper in the 2011-2012 Stampin' Up catalog. After using it and loving the color combinations I am a big fan now! Isn't that always the case? Anyway from one piece of DSP you can get four cards. The card above and below are 4-bar sized cards. Then there is a 4 X 4 card and an A10 (letter folded in thirds) card. The sets used are all from Stampin Up. They are in order from top to bottom: Triple Treat Flower, You're a Gem, Petite Pairs, Bring on the Cake and Posy Punch.


The SU colors are Lucky Limeade, Melon Mambo, and Pink Pirouette. I used Versamark and embossed all of those flowers and punched them out. It was so much fun and making the envelopes to match was the icing on the cake. I hope you enjoy them! - Heidi


Posy Punch is used to make the middle of the flower on the outside of the envelope - BTW.

Zoo Review for You!


The above card is based on another card I saw on Splitcoast. The creator used Wisteria Wonder and I used Pool Party and Island Indigo. The stamps sets are also from Stampin' Up and are called Zoo Review and Petite Pairs.


The penguin card also uses Zoo Review and Petite Pairs. I embossed the white cardstock with a striped embossing folder from SU. Then I brayered it with Basic Black. What a mess! My fingerprints are everywhere. The Basic Black didn't absorb nicely into the cardstock. I drew on the big scalloped circle with a white gel pen to get the design. This card could look so much better, but it'll have to do for now! - Heidi

Tuesday, July 26, 2011

A softball thank you


We signed Xavier up for softball this summer because he needed a structured activity to keep him occupied. The coach is a wonderful and patient man named Steve. Xavier enjoyed playing and it was a confidence booster for him as well. I made this card as a thank you to Steve for a great job coaching. The colors are Real Red and Creamy Caramel from Stampin' Up. Creamy Caramel is not really a color you appreciate until it is gone. It is a perfect baseball mitt color and now it is gone. SIGH. The set, Have a Ball is retired as well and I love it and will never get rid of it. It has all the sports in it. The words are from Cold Play which is a current set from Stampin' Up. The baseball is a die/embossing folder combo from Cuttlebug. You cut the circle and then you can make a basketball, baseball, volleyball or soccerball. I hope he likes it - I made it just for him! - Heidi

Saturday, June 18, 2011

Something old & something new!


As I was falling asleep I thought of this idea to revitalize this stamp from Season of Joy. Why not stamp in different colors and punch or fussy cut parts out to give it a different look? Much better! I always have good ideas when waking up or falling asleep - go figure!

The next card uses the new In Color, Calypso Coral. I didn't think I'd like it, but I was wrong. This card is a close CASE to one in the new IB& C from Stampin' Up. The set is Fifth Avenue Floral and also from Stampin' Up. The sentiment is from Papertrey Ink. Have a wonderful evening - Heidi

I've seen that before #2


I bought my son a pair of swim trunks at K-mart. The Joe Boxer tag was a transparency with palm trees on it over a tag of a beach sunset. I cut the words JOE BOXER off the tag and punched a bigger hole. Then I added some embossed Marina Mist cardstock and a sentiment from Teeny Tiny Wishes and there you have a tag-made-into-a-card. - Heidi

Tuesday, June 7, 2011

Yoshi for Isandro


My four year-old son, Isandro, loves Yoshi and all things Super Mario Brothers. I decided to make a Yoshi out of punches for his birthday invites. Yoshi colors are Wild Wasabi, Whisper White and Tangerine Tango. Marina Mist is the blue background on the Tangerine Tango card. I used various punches and will list them later. Have a cool day - Heidi

Directions for Yoshi (posted 10-12-2012):

You will need the following punches:
1 1/2 " circle
photo corners (retired, but you could use a square and another square for his arms)
word window
large oval MEDIUM (this is what I am going to call it)
extra-large oval LARGE
scallop oval
1-3/8 " X 5/8" oval (retired 2 catalogs ago) SMALL
corner rounder

Also needed:
thin line black marker
white gel pen
sponges
Wild Wasabi (WW) & Tangerine Tango (TT) card stock & ink
white cardstock
adhesive (I used Tombow glue)

1. Using the word window punch black card stock.
2. Cut black strip in half.
3. Using the small oval punch out two white ovals.
4. Punch two WW ovals with the MEDIUM oval punch.
5. If a shape is WW or TT sponge it before gluing it - EVERY TIME!
6. Overlap the WW ovals and glue.
7. Glue the white ovals on & then the black word window strips.
8. Draw in your eyes with white gel pen.
9. Punch another MEDIUM WW oval and adhere across the eyes.
10. Punch a LARGE oval from white and adhere just below the top of the WW oval.
11. Punch a 1 1/2" circle from WW and adhere over white LARGE oval.
12. Draw in nostrils.
13. Punch another LARGE oval from white and 2 from WW.
14. Glue the white oval over the two WW ovals to make the body.
15. Leave a little space at the bottom of the white belly oval to tuck the legs under later.
16. Punch two and sponge WW with the photo corners largest V of the punch.
17. Corner round off the "elbows".
18. Punch a scalloped oval from WW.
19. Count off 4 scallops and line the edge of the V up to one scallop and cut into the scallop for a longer thumb.  Refer to original picture above.
20. Adhere arms behind body.
21. Punch 2 SMALL ovals from WW & tuck under the belly for legs.  Adhere or tape on.
22. Punch 2 SMALL ovals from TT & sponge.  Cut about 1/3 off to make boots.
23. Punch 2 word windows from TT.
24. Adhere a TT word window with removable adhesive to a piece of scratch paper.
25. Punch the strip again so it is about 3/4" long and rounded on both ends.
26. Assemble boots and adhere to legs.
27. DONE!

Sorry it took me a year to get directions posted - Heidi

Tuesday, May 31, 2011

Sew butterflies?


Once again things at Buckaroo's house inspire me to create. I saw a card on the end table at his house and knew I had to recreate the color scheme from it. I desperately need a light box because this picture does my card no justice! The butterflies are the embosslit from SU and a die from Quikutz. They are cut from Whisper White cardstock. The background and leaves are cut from Wild Wasabi cardstock. The flowers are stamped in Wild Wasabi and Marina Mist (markers) on So Saffron and cut out by hand. Ugh, that was a LOT of cutting. It really is very stunning IRL!


The above card uses the Sew Suite stamp set from Stampin' Up. It was inspired by this card. As always I changed things around a bit. I couldn't stamp straight on the seam binding so I gave up and stamped on Pear Pizzazz. What else is Smooch for besides making the metal end of a tape measure?! It looks authentically metal. - Heidi

Sunday, May 29, 2011

I bought the punch, now what?


I bought this EK Success punch because I thought it was cute, and it is. Then I struggled to figure out what to do with it when I actually went to use it. I am far too anal to NOT have the cupcakes be colored perfectly or accurately! I dug for some old SU DSP and found the old Sweet Pea (?) stack. Close to Cocoa for the cupcake papers and So Saffron and Pretty in Pink for the frosting and this paper matched perfectly. I punched pink and yellow circles for the frosting and tucked it behind the border. The cherry is from the Build a Cupcake punch from SU & the sentiment is from Create a Cupcake also from SU. I punched the cherry out of Real Red and then colored the stem with a Chocolate Chip marker. EASY! The scalloped border is also a punch from EK Success that I love to use. - Heidi

Summer catalog Stamp-a-stack


I recently participated in a Summer Mini Stamp-a-Stack. These are the three cards I came up with for the SAS. The above card uses the stamp set Touch of Kindness from Stampin' Up.


This card uses the set Recess from the Summer Mini. Oh, not a good picture - I really need a light box!


This card was the third card that I came up with and it uses the sets The Open Sea and Word Play stamped in shimmer paint. It is a close CASE with the card in the mini catalog.


The above card is icky! It was my first idea for the SAS, but it had to go. Too blah! We have this great DSP called Beyond the Garden and only Daffodil Delight ribbon to go with it! I have tons of retired stuff to go with it, but that doesn't count. I used white ribbon on this card, but yuck! The ship card was the most popular card of mine at the SAS. - Heidi


Thursday, May 26, 2011

Bee Mine!


My four year old son, Isandro, brought home this bee-on-a-stick from his 4K class. I thought he was so cute (the bee and my son). I also thought, hey I can make that into punch art! So I did! I don't think he turned out half bad either. Of course Isandro had to tell me that the stinger was the wrong color. Xavier, the 7 year-old, also pointed out that my stripes were different from the original. It's the "essence" boys - I have captured the essence of the bee, that's what is important!


Cardstock colors: Basic Black, Real Red, Daffodil Delight, Pretty in Pink; DSP: Real Red (actually this was the backside of a birthday card that Stampin' Up sent to me); basic black marker & googlie eyes; tadpole alphabet (CuttleKid); body - 1 1/2" circle punch; head - 1 3/8" circle punch; nose - 1/2" circle punch; hearts - heart to heart & heart, small punches; antennae & stinger - 2 step bird XL punch (cut the leaves off the branches); wings - 1 3/8" X 5/8" oval; houndstooth embossing folder (Cuttlebug). Good night to you - Heidi

Nature's Walk beauty


Oh how I wish I could say this was my design, but it's not. It belongs to this talented lady here. Of course I changed it around a bit and I did pop my cage up on stampin' dimensionals. I really love this card. Thanks for the inspiration LeeAnn! - Heidi

Sail Away in crumb cake


When taking care of Buckaroo I noticed a vintage beach chair in the corner. It was navy & craft and oh so cool. I borrowed the stamp (Sail Away) from Karen and tried to duplicate the beautiful design of the beach chair. I clear embossed on Crumb Cake cardstock and then sponged Night of Navy all around it. The compass is from The Open Sea & the sentiment is from Word Play. Not the best version, but I plan on trying many more things with the Sail Away stamp! Stay tuned! - Heidi

Paper Pal Arts 80


I love this sketch from Paper Pal Arts. I loved this card by Mike Funke. The card below is a near copy of his card. The card above is a version using newer Su stuff and the foliage dies from Spellbinders.


The card below is ALL SU and all current. I love all of these cards and the sketch is awesome. I need to start participating in their challenges! - Heidi


DCWV 4 X 6 mat stacks


I discovered the DCWV 4 X 6 paper stacks at Jo-Ann's starting with the Immortal Love stack here. They are the perfect size for 4 X 6 cards (A6). The above card uses a piece of paper from the Tattered Time stack. The sentiment is from SU's set - curvy verses.


The cowboy card uses two sheets of paper from the All About Boys stack. The embossed cowbot is punched out and mounted on the background sheet. The cardstock is So Saffron and Close to Cocoa. Love this for a boys card!


This card uses another sheet from the Tattered Time mat stack from DCWV. I printed the sentiment out on my computer and punched it out. The cardstock is Ocean Tides from Papertrey Ink. I couldn't find an SU color that matched! I love it! Have a fantastic day. - Heidi